
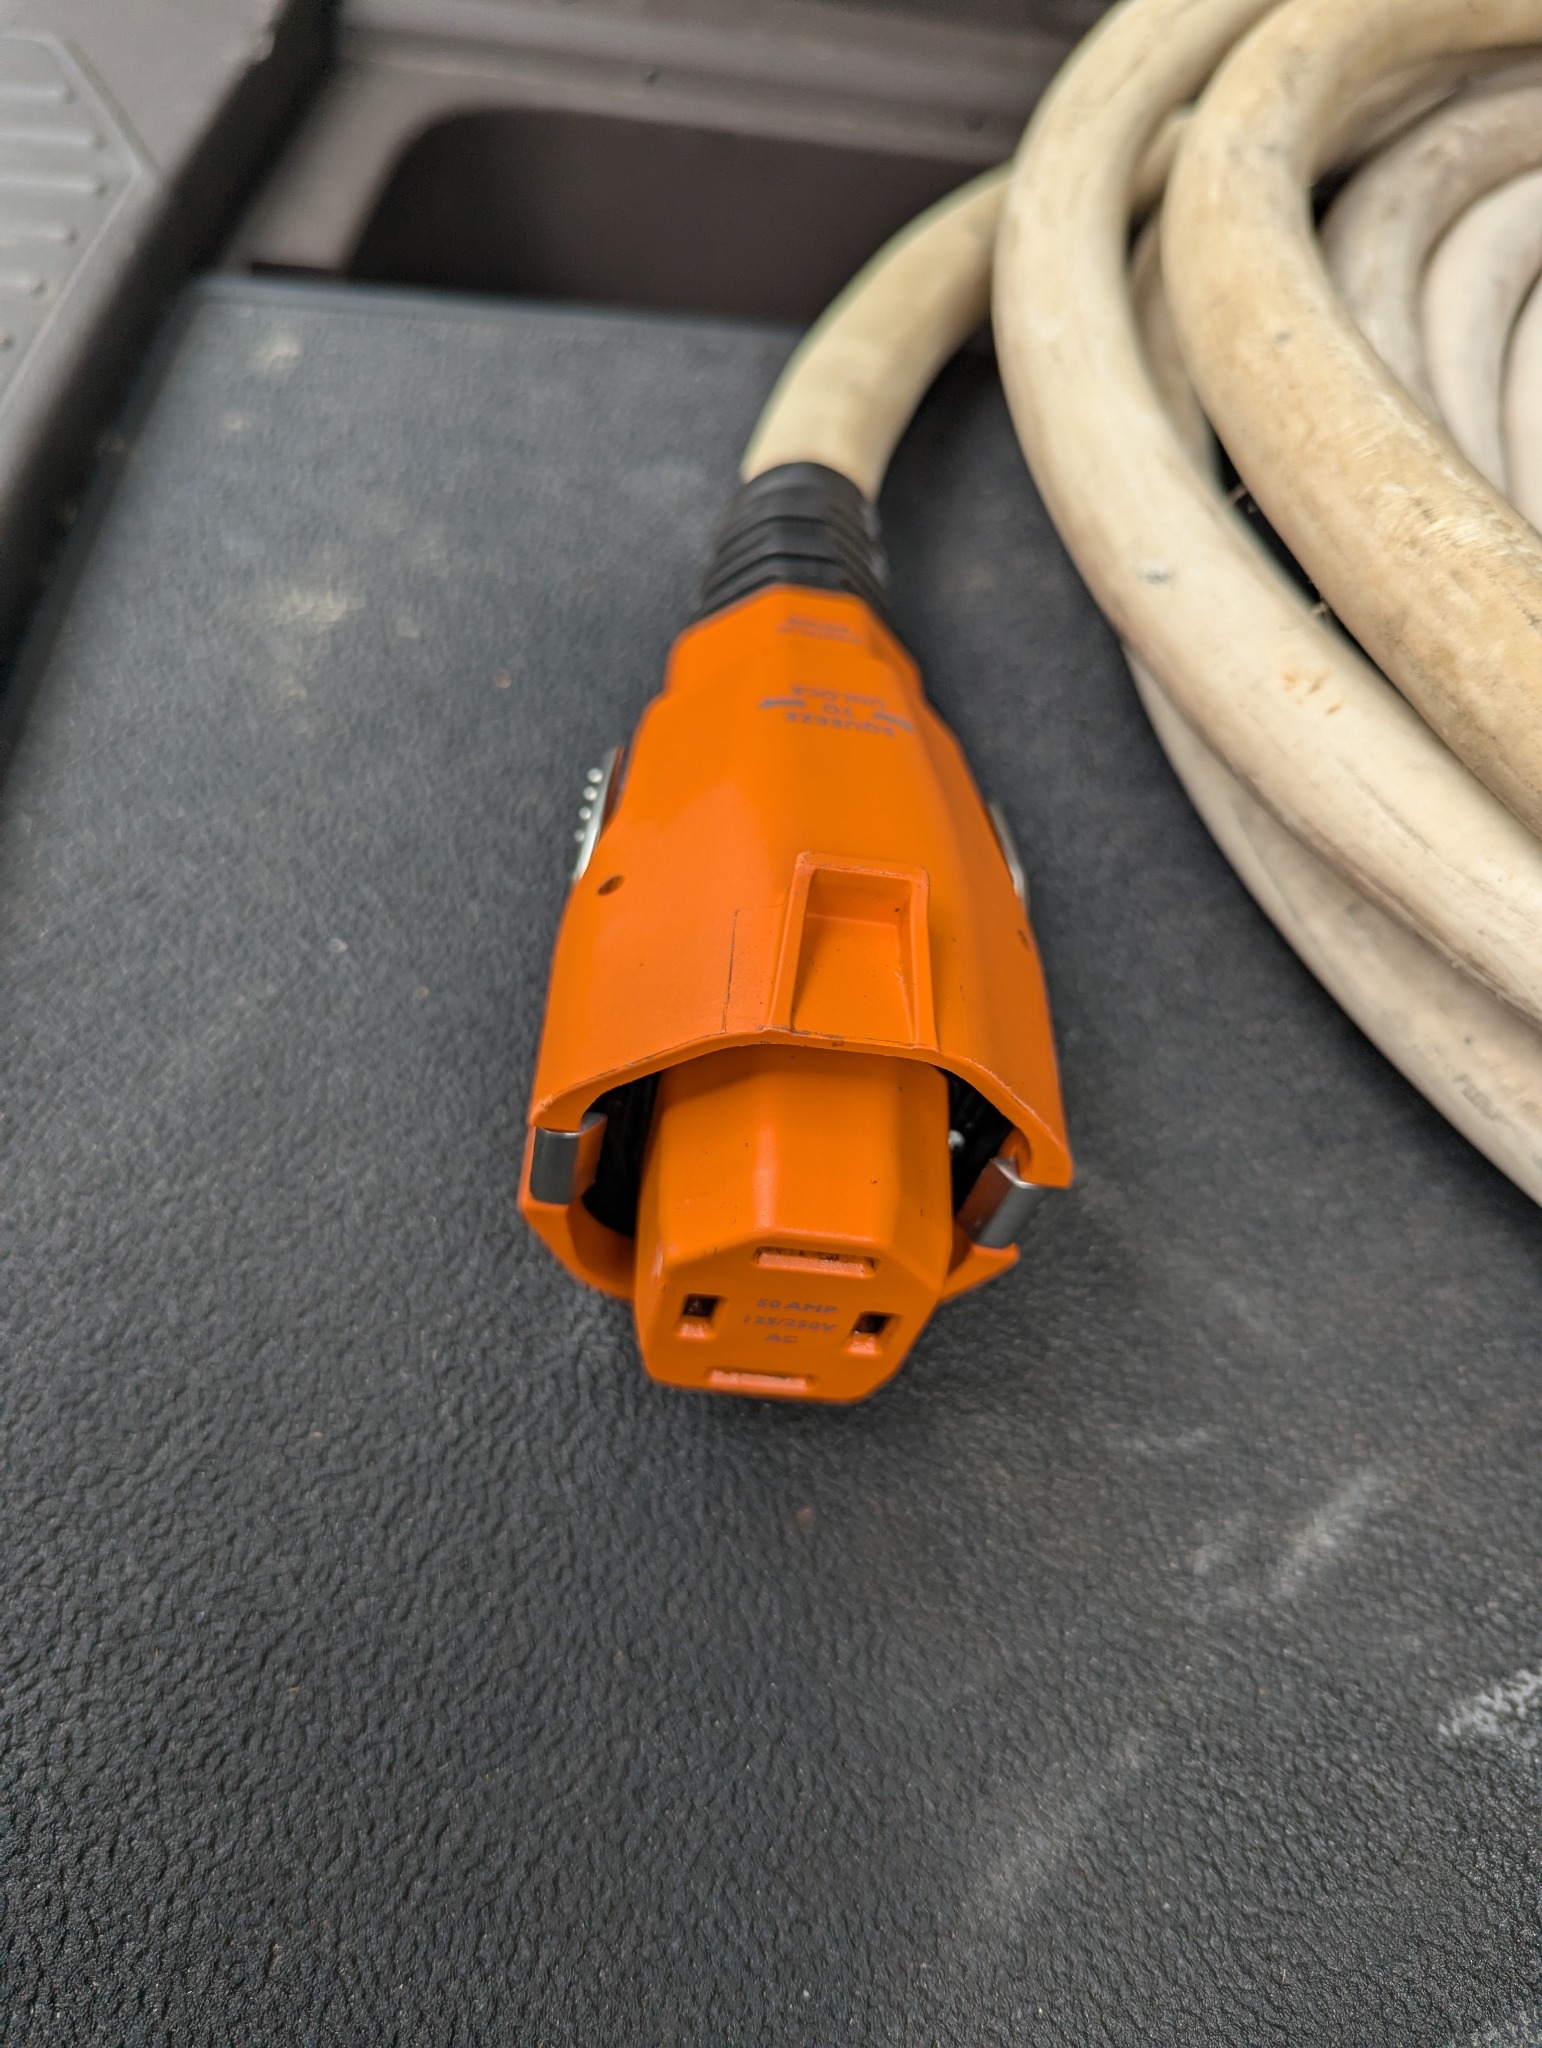
The SmartPlug BF50 cord end is assembled and now seats and latches into its mating inlet. The vessel inlet still needs installation, the wiring needs inspection, and the complete connection has not yet been electrically tested or checked under load.
A connection that had clearly been too hot
The first symptom was shore power being unavailable, with the boat’s polarity-hazard indicators lit while the 50 A cord was connected to a 50 A pedestal. On inspection, I found a burned contact at the boat-side connection. The pedestal end looked fine in my initial inspection.
The photographs show heat damage on both mating parts: the female connector on the cord and the inlet mounted on the boat. This was a reason to replace and inspect the affected connection, rather than simply try it again.
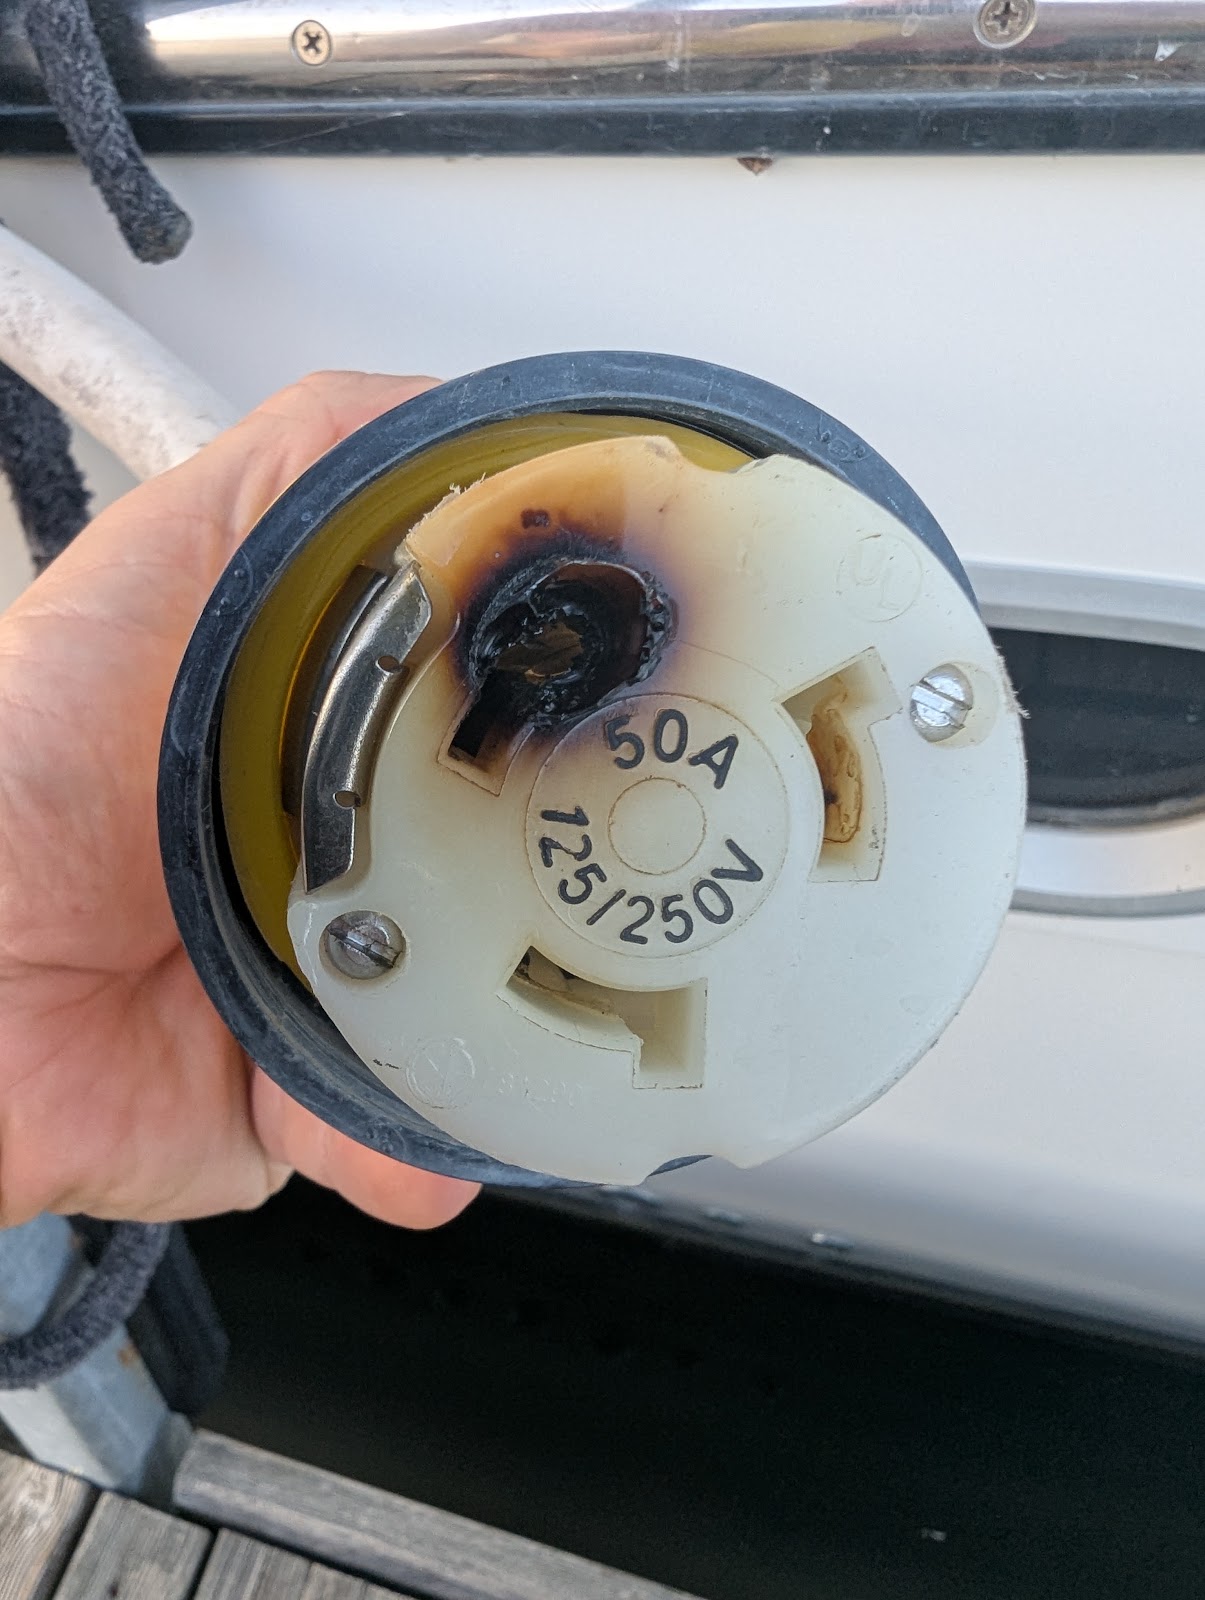
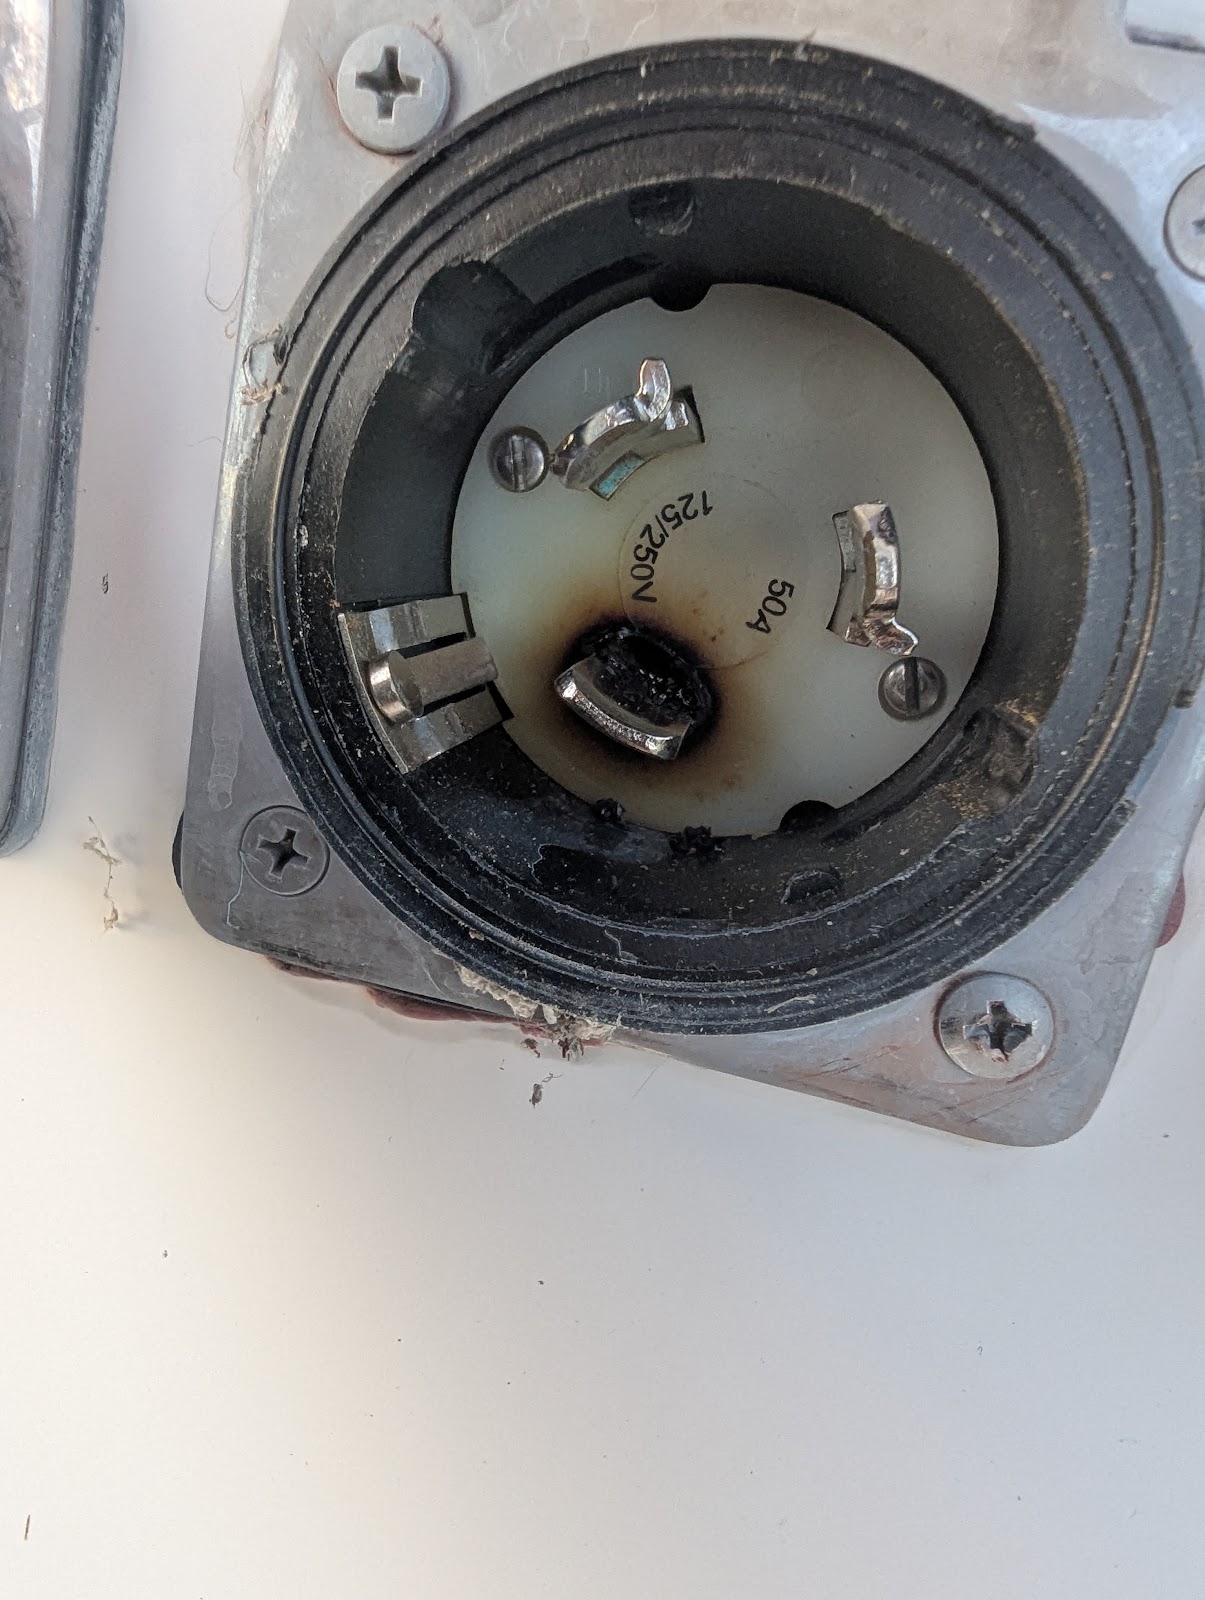
The damage is clear. The original cause of the overheating, the condition of the conductors behind the inlet, and the cause of the polarity warning still need to be established. A photograph of a burned connector cannot answer all three questions.
Why I chose SmartPlug
I considered replacing the damaged parts with conventional twist-lock components. Instead, I chose the SmartPlug B50ASSYPG 50 A, 125/250 V conversion kit: a gray BM50PG vessel inlet and a BF50 female connector for the boat end of the cord.
To me, SmartPlug seems the superior option for replacing this boat-side connection. The features that appealed to me are its larger electrical contact area, straight-in engagement, and locking arrangement that supports the connector body.
SmartPlug’s design information describes those features, along with weather seals intended to keep the connection dry. These are the manufacturer’s design explanations; I have not performed an independent comparison or measured their performance on my boat.
| Feature | Why it appealed to me |
|---|---|
| Larger contact area | A design aimed at improving the electrical connection and reducing the overheating associated with poor contact. |
| Straight-in sleeve and side locks | Positive engagement, with the plug body carrying cord movement and tension rather than relying on the electrical pins. |
| Weather seals | A design intended to limit moisture at the connection. |
The kit also gives me a way to retain the existing cord if inspection confirms it is sound. The boat end changes to SmartPlug; the conventional pedestal end can remain, subject to that inspection. I am replacing both damaged mating components, rather than attaching a new connector to the old burned inlet.
The fifteen minutes that became many hours
The cord-end job sounded straightforward: remove the damaged connector, prepare the cable, and assemble the new connector according to its instructions. I expected another “15-minute” project. The cord had apparently not agreed to that estimate.
My existing shore-power cord is thick, and fitting its conductors, jacket, seal, and clamp into the connector turned out to be the hard part. I could assemble the connector, but it repeatedly would not seat far enough into the mating inlet to latch properly.
What followed was many hours of disassembly, checking, and reassembly. I re-cut the cord, stripped the conductors to the specified SmartPlug dimensions, formed them to fit, and verified that I was using the correct seal for the 125/250 V cord.
The important change in approach was to isolate the parts that could be causing the problem. Instead of treating the entire assembled connector as one mystery, I tested what would latch and what would not.
Finding what was stopping the latch
| Check | Observed result |
|---|---|
| Connector and inlet tested without the cord | The connector latched correctly. |
| Face seal installed during the fit check | The connector still latched. |
| Cord fitted, with cord clamp removed | The connector could latch. |
| Cord clamp in its original position | The assembled connector would not latch properly. |
| Cord-clamp mounting changed to allow a different position | After reassembly, the connector seated squarely and latched. |
That sequence pointed to the cord and strain-relief geometry. The mating connector and inlet could engage; the problem appeared when the thick cord was held by the clamp in its original position.
I changed the cord-clamp mounting so the clamp could sit approximately ¼ inch farther up the cord. After reassembly, the connector seated squarely and the latches engaged. That is the mechanical fit result documented in this update.
The clamp change is specific to my assembly. The altered arrangement still needs to be verified against SmartPlug’s requirements for cable retention, sealing, and connector fit before returning it to service. Manufacturer approval of that change is not documented in my records.
For another installation, the useful lesson is to check the actual cord dimensions and its fit with the specified seal and clamp early. SmartPlug’s installation instructions and support information are the reference for the approved assembly.
Costs, options & sourcing
The SmartPlug kit came from Amazon. The September 26, 2026 receipt records an order total of $267.18 including tax. It covers both the vessel inlet and the boat-side female cord connector.
| Option | Recorded price | Decision |
|---|---|---|
| Conventional twist-lock inlet and cord connector | No comparable quote recorded | A replacement route I considered, but did not choose. |
| SmartPlug B50ASSYPG inlet and BF50 connector kit | $267.18 including tax Amazon · September 26, 2026 | Purchased to convert the boat-side connection while retaining the existing cord if its condition permits. |
I cannot put a dollar figure on the difference between these options without a comparable conventional-parts quote. My choice was based on the design, rather than a documented claim that the conversion would be cheaper.
The receipt provides the purchase total, but did not show a posted payment date when captured. Any additional supplies, professional work, or replacement of damaged wiring still need to be recorded. My own many hours of fitting and troubleshooting are not assigned a labor charge here.
$267.18 is the recorded kit cost, not a final all-in repair total. A complete cord replacement has not been purchased for this project.
Sources: reviewed purchase record, project updates, and original photographs through October 3, 2026. Private receipts, correspondence, delivery details, and identifying information remain outside this article.
What is finished, and what comes next
The new cord-end connector is assembled and can now seat and latch into its mating inlet. The vessel inlet still needs to be installed, and the conductors behind the old inlet need inspection for heat damage.
The remaining work includes resolving the clamp-arrangement questions, completing the inlet installation, and verifying the electrical connection, polarity, and absence of abnormal heating under load. Those results are still ahead; the shore-power repair is not yet recorded as complete.
I still like the SmartPlug design. The surprise was how much work my particular cord added to an apparently simple connector swap. Next time a boat project looks like fifteen minutes, I will at least ask the cord for its estimate.
I keep the detailed private record for this project in NautiFile, the boat-records app I’m building for equipment, service history, documents, photos, and expenses. Read the story behind NautiFile.
Loading comments…